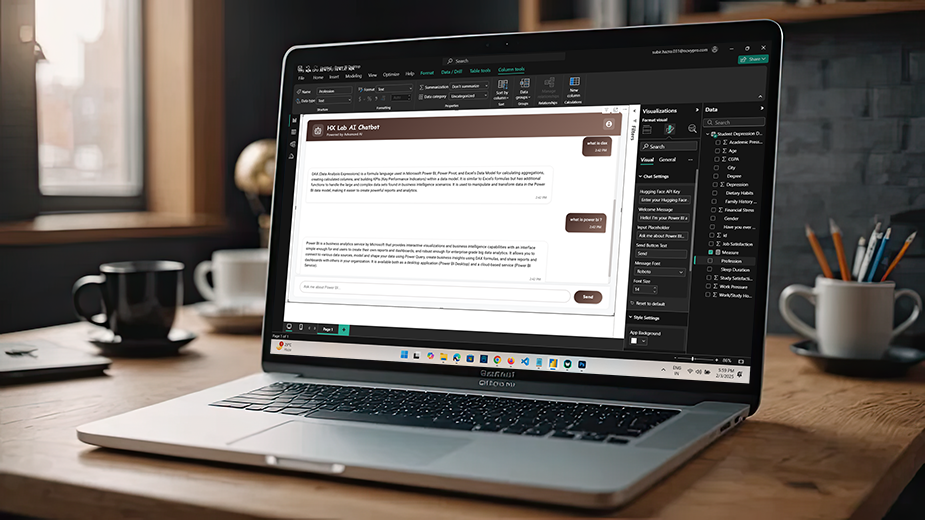
How to Use Power BI AI Chatbot with the Hugging Face API: A Guide by HX Lab AI Chatbot
- Subir Hazra

- Feb 3, 2025
- 4 min read
Creating interactive and intelligent experiences within Power BI can significantly enhance your storytelling capabilities. If you’re new to integrating AI tools, customizing your own chatbot can be both a simple and rewarding process.
This guide will walk you through creating a tailored AI chatbot visual, called HX Lab AI Chatbot, built using TypeScript and powered by Hugging Face’s Mistral 7B Instruct (v0.3) API.
Hugging Face API Integration
To make setup easier, I’ve integrated the Hugging Face API directly into the chatbot. The Hugging Face free tier allows you to use the API at no cost, but keep in mind that the free plan has a limit of 1,000 API calls per hour. If you require higher usage, you may need to upgrade your plan accordingly.
Setting Up Your Chatbot
Before jumping into customization, ensure your Power BI environment is prepared. To activate the chatbot functionality, start by adding a dummy measure or calculated column. This acts as a basic element for smooth integration into your reports.
Once your measure or calculated column is ready, proceed with the initial setup of your chatbot. The HX Lab AI Chatbot is designed for user-friendliness and flexibility, making interactions seamless.
Chat Settings
The customization journey begins in the Chat Settings. This section provides multiple options to personalize the chatbot's responses and interface for an engaging user experience.
Hugging Face API Key: Input your Hugging Face API Key, which is essential for linking the chatbot to the AI model that processes user queries. A functional API key can improve the chatbot's accuracy, making it more efficient.
Welcome Message: Customize the welcome message to create a warm introduction. For instance, instead of a generic "Hello," try something like "Welcome! I'm here to help you navigate your data."
Input Placeholder: Define the placeholder text for the input box. Clear instructions like "Ask me about your sales data!" can guide users effectively.
Send Button Text: Change the text on the send button to reflect your brand voice. Instead of just "Send," consider "Go!" to make it more engaging.
Message Font: The choice of font can impact user engagement. Select a font that resonates with your brand identity while ensuring readability.
Font Size: Adjust the text font size for optimal readability. Studies show that about 16px is a standard size for body text to ensure comfort while reading.
Reset to Default: To go back to the default configuration, click the "Reset to Default" button.
Style Settings
The visual look of your chatbot significantly affects user perception and interaction. In the Style Settings, you can customize various visual elements:
App Background: Select a background color that matches the theme of your Power BI dashboard to ensure a consistent visual experience throughout your report.
Chat Window: Adjust the chat window color to improve visibility while maintaining a unified design. For instance, a light background with dark text can make messages easier to read.
App Bar Color: Alter the app bar color to facilitate navigation and enhance interaction with the chatbot.
App Bar Gradient: Consider using a gradient for the app bar to create a modern look and feel, while also drawing attention to the top of the interface.
User Message Color: Choose a distinct color for user messages to differentiate them from bot messages, ensuring clarity in conversations.
User Message Gradient: Implement a gradient for user messages to add depth and visual interest, making the chat more engaging.
Bot Message Color: Select a contrasting color for bot messages to maintain visual separation from user messages and enhance readability.
Text Color: Make sure there is sufficient contrast between the text and background colors for better readability. Typically, light text on a dark background, or the opposite, works well.
Reset to Default: If you're unsatisfied with the new look, the "Reset to Default" option restores the original design settings quickly.
Adding Connectivity Options
To enhance the user experience, I’ve added a direct access feature in the top-right corner of the chatbot. Users can connect with me via LinkedIn or visit my personal website for any queries or assistance.
According to a HubSpot study, providing direct connection options can increase user engagement by up to 30%. This feature not only adds a professional touch but also ensures users have a quick and convenient way to seek further support when needed.
Testing Your Chatbot
Once you've customized your chatbot, it's crucial to test its performance. Interact with it as a typical user would. Ask a variety of questions and evaluate how well it responds. Keep track of any inconsistencies or areas for enhancement based on user interactions and feedback.
Keeping It Updated
Your chatbot should evolve alongside the digital landscape. Regularly updating its functionality and settings is vital to maintain relevance and user engagement. Consider revisiting the Chat and Style Settings every few months to align it with your audience's needs and preferences.
Final Thoughts
Creating and customizing the HX Lab AI Chatbot within Power BI, using TypeScript and Hugging Face’s Mistral 7B Instruct version 0.3 API, presents an exciting opportunity to infuse interactivity into your reports. The features in Chat Settings and Style Settings allow you to align the chatbot with your brand and enhance user engagement.
Furthermore, adding connectivity options enriches the experience, creating valuable touchpoints for your users. Whether addressing data queries, providing guidance, or facilitating a friendly chat, a well-designed AI chatbot can make a noteworthy impact.
By following these steps and suggestions, you can build a chatbot that serves a functional purpose while enhancing the narrative of your Power BI dashboard. Get started on personalizing your chatbot and let it guide your users through their data journey!